Requirements
PWT SEO 2 and higher
- Joomla 3.8 or higher, Joomla 4 and Joomla 5 (requires "Behaviour - Backward Compatibility" plugin enabled for now)
- PHP 7.2 or higher, PHP 8 or higher
- MySQL v5.0 or higher
PWT SEO 1
- Joomla 3.8, Joomla 3.9 or Joomla 3.10
- PHP 5.6 or higher
- MySQL v5.0 or higher
General Usage
After installing PWT SEO all necessary plugins are already enabled. You can head straight to your Joomla articles or menu-items and a tab called SEO Score will be available. As soon as you enter an SEO keyword or keyphrase, your SEO score will immediately be calculated. Simply following the instructions of the plugin should result in ever higher scores. This should be pretty self-explanatory.
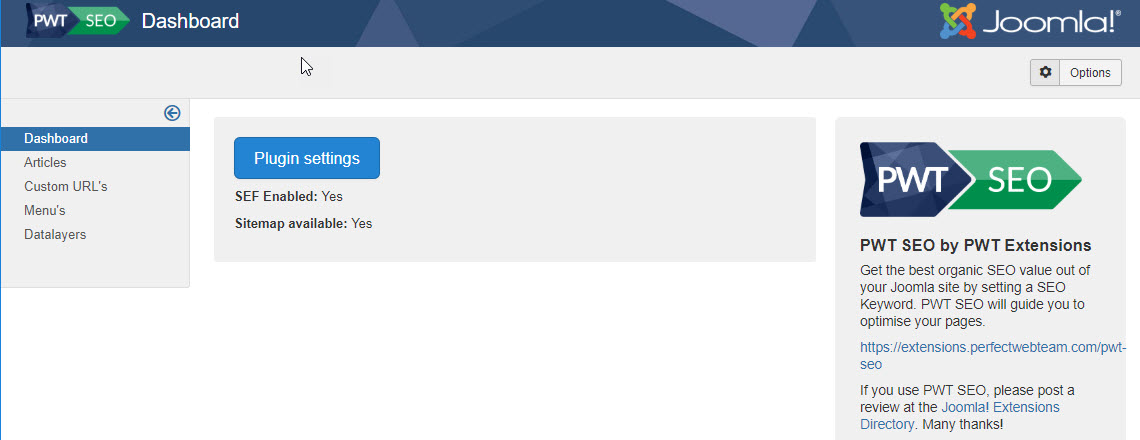
You can see an overview of all your SEO score in the component overview for PWT SEO.
Note: currently you need to either use TinyMCE or JCE to make the SEO Score visible!
Initial Configuration
PWT SEO hardly requires any configuration, it works out of the box for most users. However, a few items are configurable. This can be done in 2 loacations: Plugin-settings and the Options button in the component. First, let's go to Plugins >> PWT SEO:
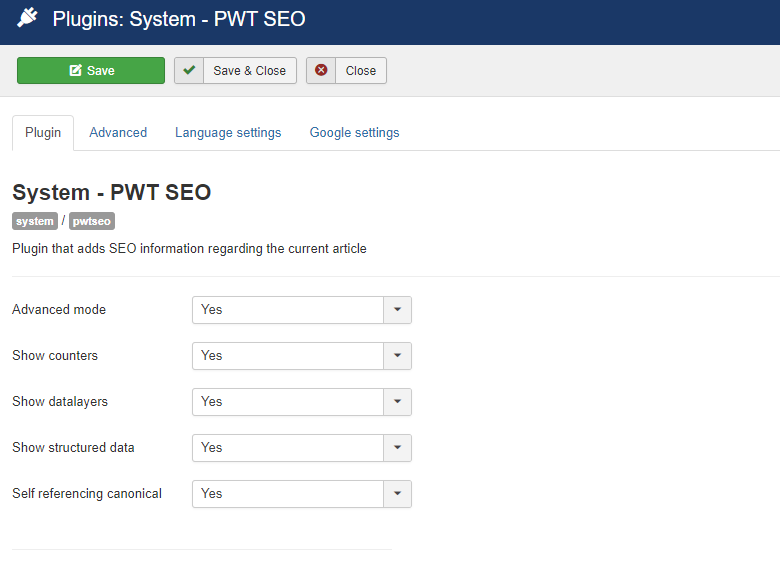
- Advanced mode is switched off by default. If you switched it on, the standard Open Graph fields in the SEO Score tab are replaced by fields that you can use fully customized. This is only needed for very experienced users.
- Show counters: By default, counters for the character count are shown next to the fields for article title, pagetitle and metadescription. If you want, you can disable this feature.
- Show datalayers: Activate if you use data layers from your Google Tag Manager set-up. If you decide to do so, please make sure you set your GTM Container-ID in the Google settings tab.
- Show structured data: Activate if you want to configure structured data in your articles.
- Self referencing canonical: Joomla does not use canonical URLs in most of your pages. In many cases though, they have good use (especially when using anchor links within a page), but also many SEO experts (not all) advise to implement them. With this parameter, your articles will have self-refererencing canonicals. You can also disable the default behaviour here. In both situations, it is still possible to override the behaviour in every single article.
In the advanced tab you can also set minimum and maximum values for your page/title and metadescription counters. Also, in some cases, you may use the title-selector fiels:

In most cases you don't need this. Only if you use a template that does not fill the article title in a normal way, you can indicate the HTML-element that is displayed. As an example, it could be something like "uk-article-title a".
Component - Options
A second set of options is found under the options button in the PWT SEO component. let's go through the options:
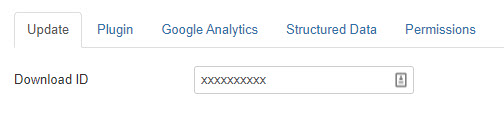
Update Option
PWT SEO works with the Joomla core automatic update system, but you need to set up the extension for this. To do so, you need to enter your download ID into the configuration.
You can find your download ID in the PWT dashboard at extensions.perfectwebteam.com/dashboard (make sure you are signed in). There is a download ID for every extension. Copy the download ID.
Then go to Components >> PWT SEO and click the Options button at the top-right. Then go to the Update tab and paste it:
Plugins Option
This allows you to set some handy presets:
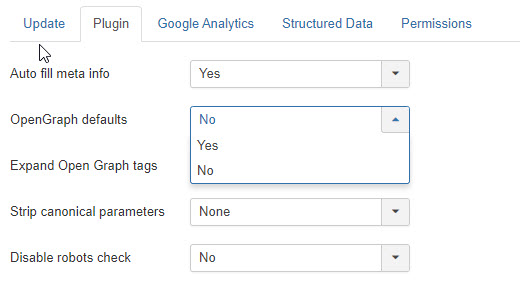
- You can have your metadata auto-filled based on the starting-text of your article (though we advise manually filling them in for best results)
- You can set defaults for your Open Graph data. Set it to Yes and you can define the options. Default is to use page title for Open Graph title, etcetara. This definitely is an advised set-up.
- Expand Open Graph tags: whatever you find usefull
- Strip canonical parameters: read below in the section about canonical URL settings how to use this
Analytics Option
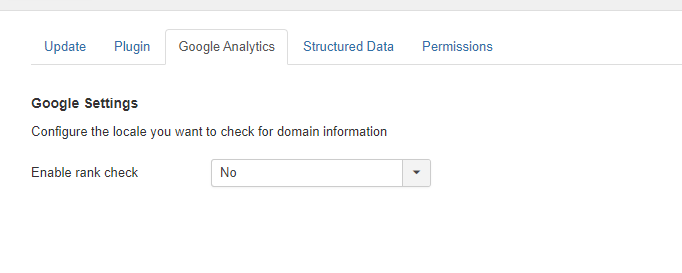
- Enable rank check Yes / No and the country you wish to check ranks for. if you activate this, you will find the Google ranking for the keyword provided in the article (provided it is found in the top 100). You will find it in the PWT SEO tab in the article, at the bottom of the SEO checks
Structured Data options

Finally, there are some options for global structured data, which pretty much speak for themselves.
Component view
You can access the component view via Components >> PWT SEO:
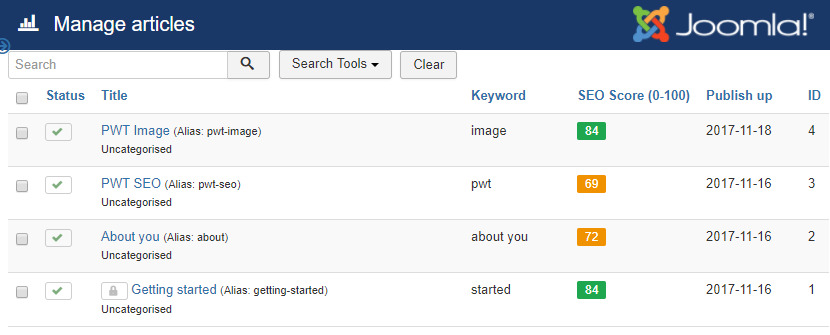
Mostly, you will work with the Articles or Menu´s views, as this gives you an overview of how your articles or menu´s are doing:
Clicking an article brings you directly into the Joomla core article editing view. Exiting the article you will return into this view. Note that you can just as easily work from the Joomla Article overview if you want.
Note: you can also use Custom URLs, scroll down to see how that works.
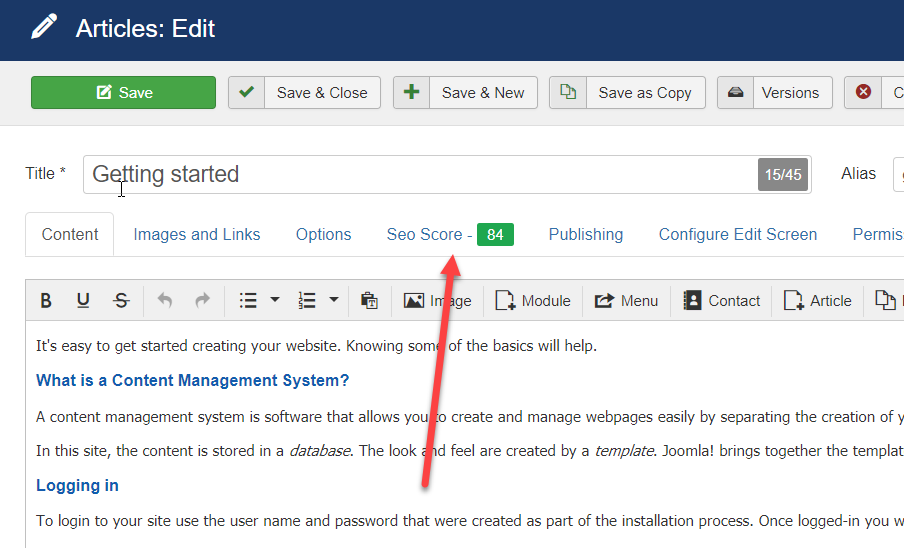
SEO Score
Inside every article you will now see an SEO Score tab:
The score will only be calculated if you have filled in a keyword for the tab. Scores range from 0 to 100 for perfectly optimized articles. Also a color-rating is added to be able to roughly charaterize the scores (red=bad, orange=reasonable, green=OK).
By the way, if there is an update for the PWT SEO keyword plugin, this could be reason for updated calculations for your SEO Scores. You will see this in the PWT SEO Articles overview. Your score will have a small asterix, that indicated this when you hover over it. To recalculate your rankings, you will have to enter and save the article.
Character counters
For every field applicable, a character counter is added at the end of the field:

This feature is available in the fields for:
- Article Title
- Page Title
- Metadescription
It lists both the current character count and the advised maximum length of the field. Note that this maximum is a conservative maximum to be on the safe side. Going a few characters beyond is not critical. Note the green color in the counter. Going over the configured maximum count gives an orange / red color.
Also, be aware that for the count for the Article Title field, it does not check whther you have set your Sitename to prefix or append your page titles.
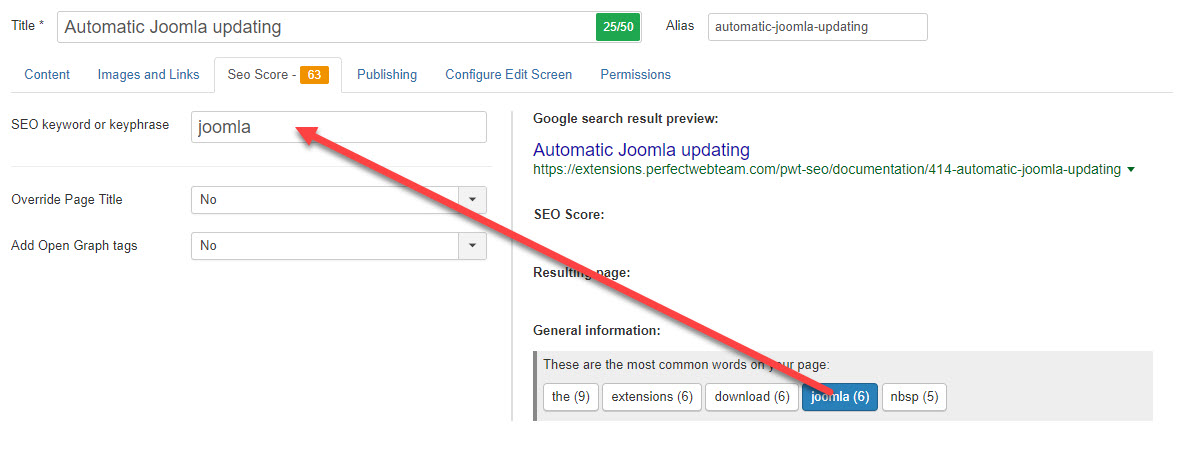
Field: SEO keyword or keyphrase
The whole SEO Score is dependant on the field called SEO keyword or keyphrase:

It is very important to think very carefully about what you fill in here: this is really what you should do yourself. Make sure it is very relevant and specific for the text you will be writing! If you choose an irrelevant keyword, the whole SEO score is useless. You can either fill in a single keyword here, or a keyphrase consisting of multiple words (we suggest no more then 3 words).
Note that below the scores on the left, there is an overview of the top-5 most used words on the page. If you click one of these, it is set as the keyword for this article:
By the way, an en excellent article on keyword research is available on the Moz.com website.
Field: Override title
The next field is the Override title field. If you leave it set to the default of No, the page title as generated by Joomla will be used (usually derived from the article title). However, if you want to improve it, you can set the value to Yes. A new field will show, allowing you to fill in an improved page title:

Note that the page title is the field that controls the title of the snippet in Google Search. Often this field is referred to as the Browser Page Title.
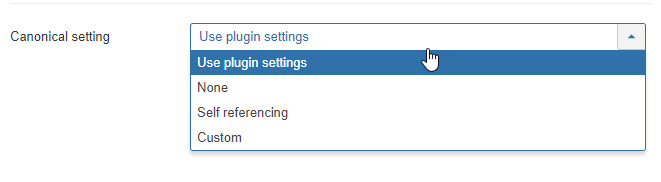
Field: Canonical setting
The field Canonical setting is used to configure you canonical URL. The default setting is to use the setting in the PWT SEO plugin. For most sites, having the plugin setting set to "Self-referencing" is optimal. However, in each article, you can override this::
You can even link to custom URLs, either internal or external.
In PWT SEO version 1.5, some more features related to canonical URLs were added. In the PWT SEO options, you will find th field "Strip canonical parameter":
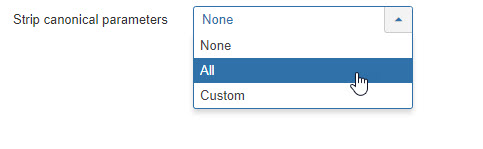
This can be useful in situations where you find URLs indexed with a parameter. As an example: When a URL is shared on facebook and a user clicks it, he is not sent to the default URL (say: example.com/this-page), but to a URL with and added string: example.com/this-page?fbclid=IwAR3ybZQl1tqXF4d8JdiM. This van be usefull for tracking purposes, but Google may now index this page as well, creating duplicate content issues. Stripping this string in the canonical URL is the advised measure to tackle this.
Field: Show Open Graph tags
The field Show Open Graph tags is used to specify Open Graph information. This controls how your page snippets will display in social media like Facebook, Twitter and Google+. If you leave it to No, no information will be generated. However, setting it to Yes opens up fields to generate it:
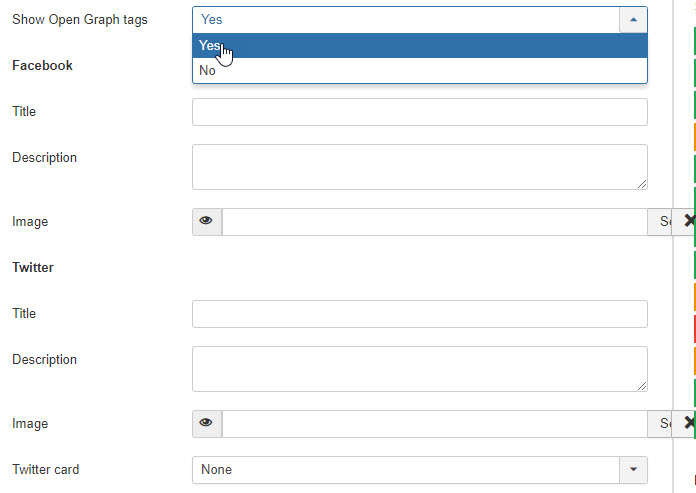
Note that only the Facebook fields show in the screenshot, but Twitter and Google are also included. For most users, these fields will suffice.
Custom Tags
Many users may need nothing more but the fields provided in the Open Graph section. However, advanced users may ned more fields. These users can add as many as they want. For this to work, you need the Advanced Mode switched on in the plugin settings. Having done so, you now have a Custom Tags button:

Clicking this field allows you to add any number of tags and corresponding values, like this:
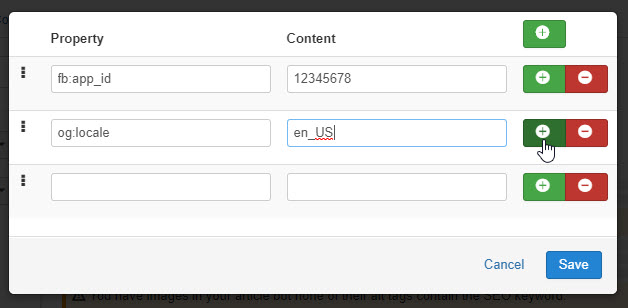
Clicking the Plus-button allows you to keep adding fields.
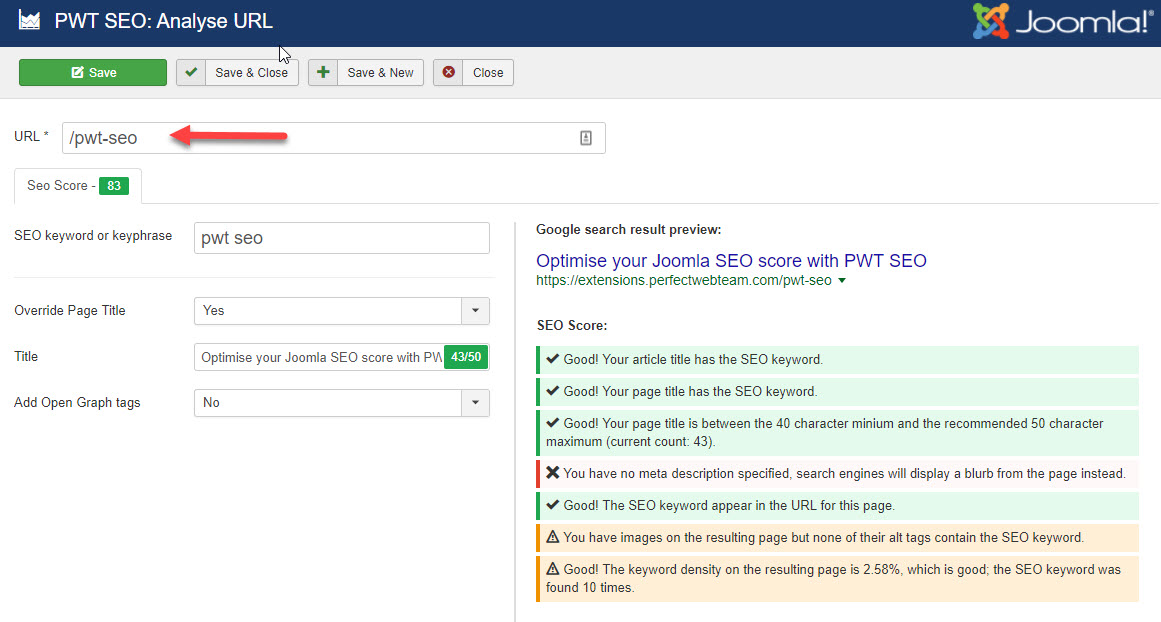
Google Search result preview
Based on your settings for page title and metadescription and the calculated URL, a preview is generated of how your article's URL should look like in Google Search:

You will have to keep in mind that this is based on the assumption that you filled in relevant values. If Googles thinks these values are not relevant for the article, it will dispose your settings and generate some text.
For the URL, keep in mind that this is the URL that is the first URL found by the Joomla Router. If you create more menu-items to the same article, it cannot show all. You should prevent this situation anyhow, otherwise you will have duplicate content issues.
SEO Score results
Next to the SEO Score as shown in the tab itself, full details of the individual components from which the score is calculated are shown as well:
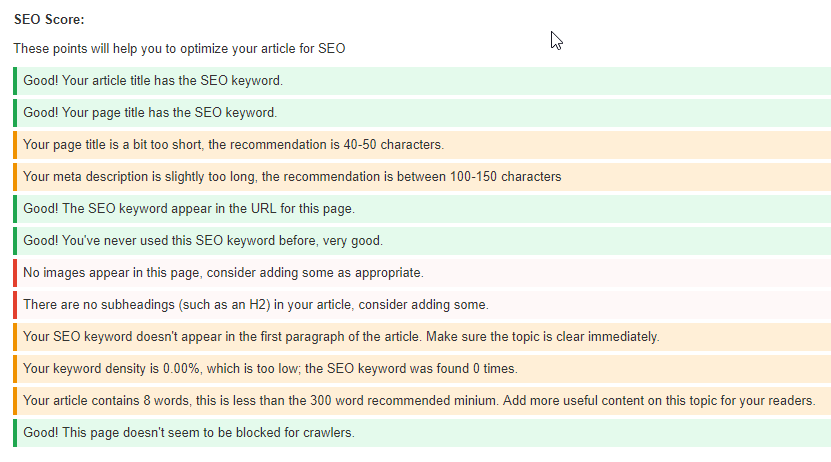
You may have already noticed that these scores are constantly updating as you make changes to text or metadata. You don't have to hit the Save button for this. We tried to make the instructions as clear as possible, so they should not need further explanation.
Resulting page
Finally, there is a section in the SEO Score tab for the Resulting page:
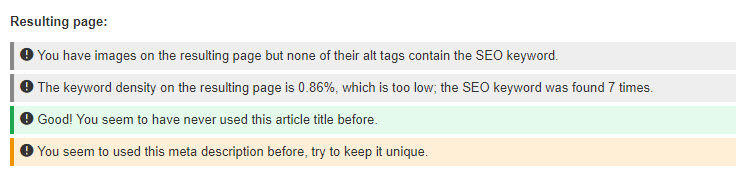
Here, the plugin makes a quick analysis of the full HTML of the URL the article will be shown on. Usually, this will be the actual article, PLUS the surrounding modules. As you cannot modify the modules output per individual article, we made this section not count towards the SEO score, but it gives you a rough indication of any issues the modules could give you.
Also, this feature can help you if your articles contain non-valid HTML: many page-builders, like Yootheme Pro, SP Page Builder or more have funny HTML inside the actual article database, which is only interpreted into correct HTML on the front-end. With the resulting page feature, you still have an idea of the correct implementation of your SEO keyword(s).
Custom URL's
In version 1.1, Custom URL's were introduced. This is an excellent feature to also optimize non Joomla-core content. Though the feature does not contain all features that are available inside Joomla articles, it can still optimize the page with optimized page title's, canonical URLs or Open Graph data. Also you can check the resulting page compared to your keywords:
Set up structured data
You can configure structured data inside your articles. For this purpose, click the Customize button next to Structured Data:

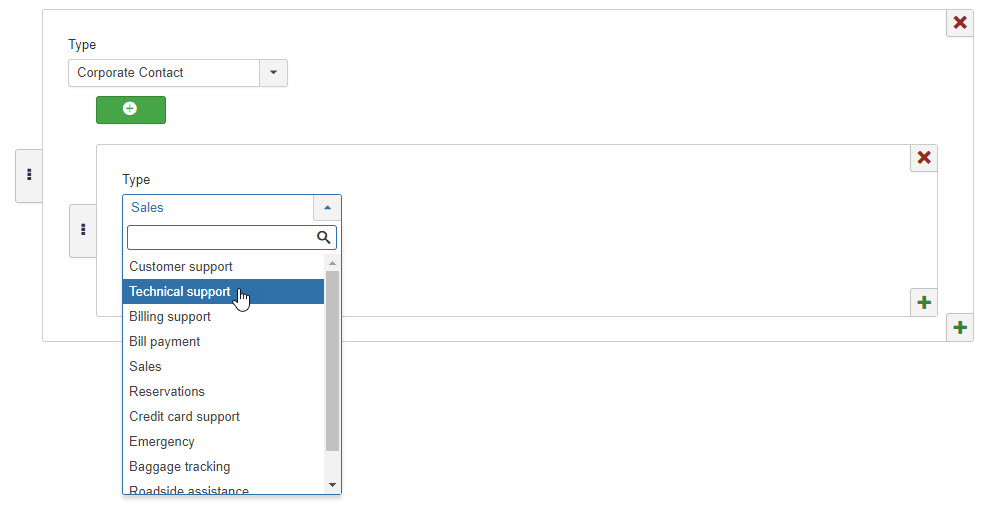
When you do so, a screen will pop up where you can populate all the fields you need. First of all, you can choose between different types of structured data. The options currently available are the following:
- Article
- Corporate contact
- Event
- Product
Note that you can use the + icon to set multiple types of structured data per article if needed.
Based on your choice, the set of fields to fill in is set and you can customize these. As an example, this is how the Corporate contact option looks like:
Set up Data layers
Advanced users can use PWT SEO to set up Google Tag Manager Data Layers to push data from their site into GTM and Analytics. To set these, don't forget to enable the feature and set your GTM-container-ID in the PWT SEO plugin settings. Then go to the component view and create your first data layer. In the example below I simply type in some dummy data, but of course this should correspond with the data you want inside your GTM account.
This is what you see if you create a new data layer:
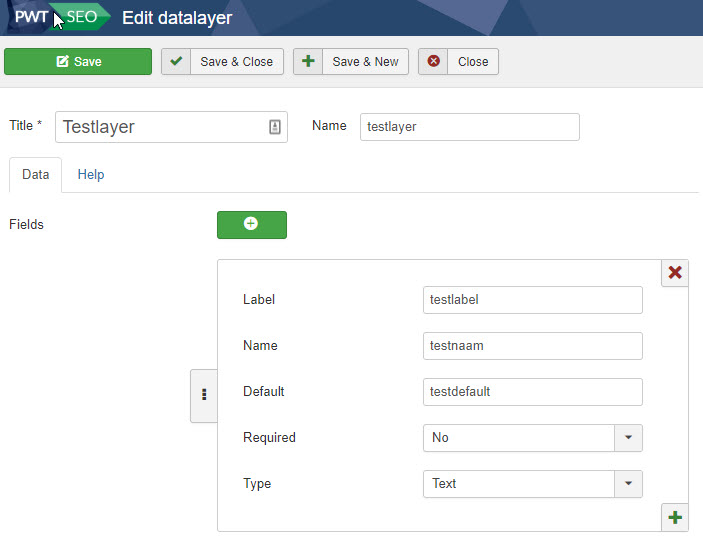
The layer should have a Label and a Name. You can choose whether the layer is Required or not and you should use a Type (default is Text). You can pre-populate the Default value or leave it empty.
If you save the layer and then go to the PWT SEO tab inside an article, you will see the layer if you click the Configure button next to Datalayers:
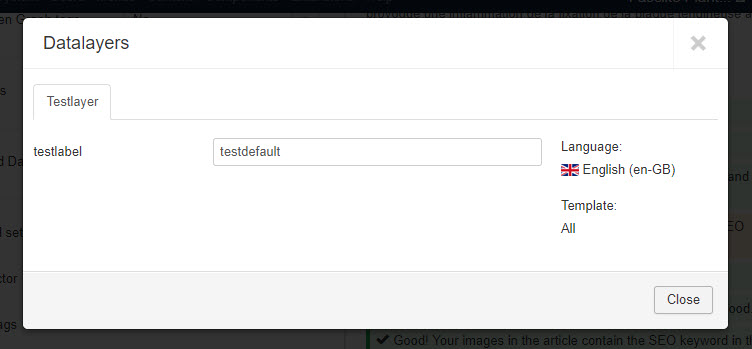
As I specified a default value, you see it here, and you can choose to either leave it or edit it.
FAQ and known issues
- I do not see my SEO Score
Make sure you use either TinyMCE or JCE as your editor. Without an editor, the tab may not display correctly. - My new article does not have a score for the URL
If you create a new article, PWT does not (yet) take into account the URL. To do so, first save the article so that an alias is generated for the article (or create one yourself). Only then the score for the URL is also calculated. - There was an error retrieving the resulting page. Error 500
Make sure the resulting webpage is available to the public. If you still have this error, caching may prevent the plugin from working properly. You can try to change the order of the plugins so that PWT SEO comes sooner then any caching plugin.